Simple Steps For an Organized Google Drive 🗃️
My stress-free process for organizing your digital files
Cloud storage revolutionized the way we store information, collaborate, and communicate — but all those files can get really messy, really fast! File disorganization can slow us down, cause stress, and make it harder to work efficiently.
Thankfully this is one area I am *really* passionate about. Practically my entire life is organized in Google Drive, and keeping it pristine is sort of my pride and joy. I mean, just look at her 🥰
Below is a guide for the exact steps I recommend following to organize your Google Drive, especially if its something that feels overwhelming — this step-by-step process can help reduce stress and gently guide you through it.
You’ll notice that I’ve integrated various visual elements — color-coding, numbers, emojis! All of these are optional, but can help your brain remember the pathways to different files and create a little extra motivation for keeping your files sorted.
I recommend reading the entire post before you start organizing, so that you have a feel for the entire process and know all the time-saving tips.
And if you still feel like you need someone to hold your hand while you do it, consider booking a free 20-minute call with me to learn how my Hourly Project Packages can help with digital organization.
1️⃣ PHASE ONE:
👀 STEP 1 - Assess + prep your Drive
Open up the Google Drive you want to organize and peek at the folders and files to get a feel for the type of information that exists there.
If things are already organized in folders, you can leave them. But if it feels helpful to see all the files in one place, you may want to move them back to the main drive and then delete (or rename) the empty folders.
Then peek at the bottom left corner of your Drive. You should see a small progress bar that shows how much space you are occupying and how much you have access to. This can help you determine how aggressive you need to be with deleting and removing files.
🤔 STEP 2 - Decide on Your Top Level folders
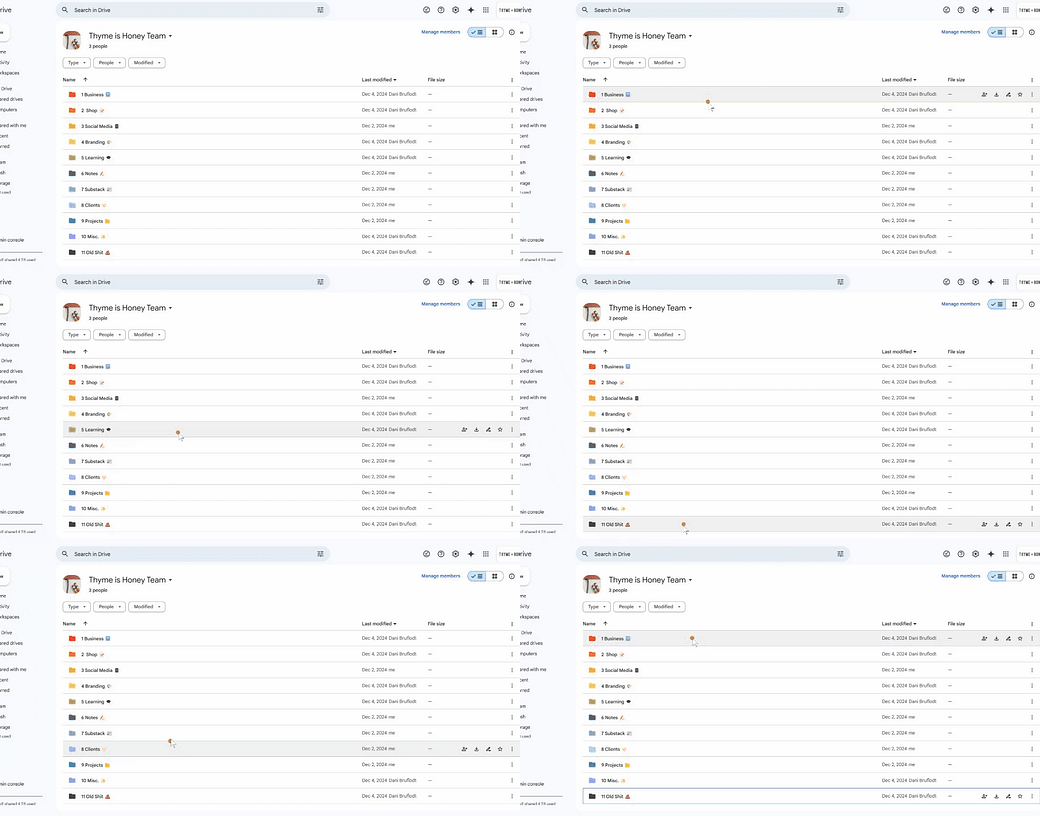
Think about what “big buckets” make sense for the type of information that exists within your drive. Is it personal? Business? A combination? I suggest having no more than ten top-level folders, but in certain instances it might make sense to have more or less. What top-level folders make sense will vary person to person. Mine look like this:
Drive will allow you to organize the folders alphabetically or by date modified. I add numbers to my folder names so that I can keep them in a specific order. When sorted alphabetically it will sort numbers chronologically. Note: I explain the color-coding and emojis in a later step.
📁 STEP 3 - Create those top-level folders
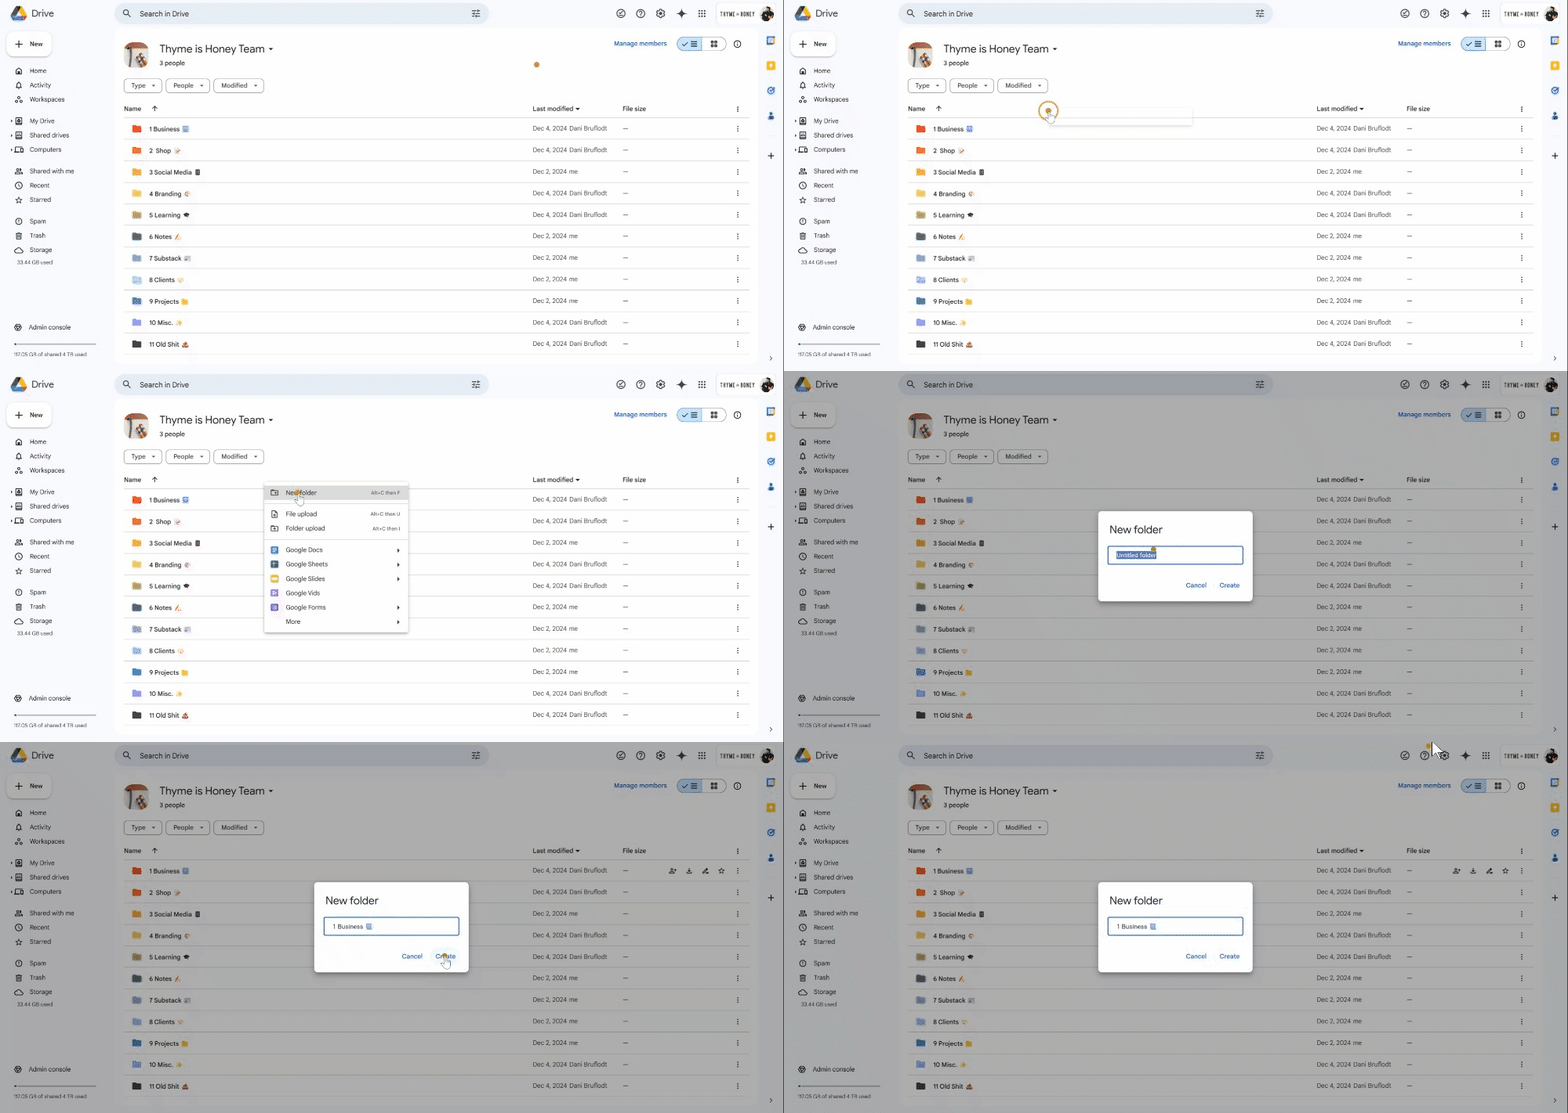
Once you’ve decided what top-level folders make sense for you, go ahead and create them by following these steps:
Right-click anywhere in Drive and choose “Create new folder”.
Type in the name and click “Create”.
Remember you can always edit the name later, add more folders, combine them, etc. so don’t feel like this is locked in stone.
💩 STEP 4 - Create a “catch all” folder
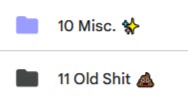
Now we’re going to create an additional folder (or two!) for files you’re unsure about. Maybe you don’t know what it is, where it goes, or if its something you could delete. You might call them “Miscellaneous" “Old Stuff”, etc. Personally, I have two “catch all” folders, and I call them:
Misc. ✨ houses various files that don’t necessarily fit into the previous 9 top-level folders.
Old Sh*t 💩 houses files that are outdated or irrelevant and are no longer needed (maybe I’ll delete ‘em later).
At this stage I would not worry about deleting files unless you know *for sure* that they are not something you will ever need again. Instead, place these files in one of these “catch-all” folders. We’ll circle back around at the end to delete things.
🌈 STEP 5 - Assign them each a color and/or emoji (optional!)
Color-coding your folders and adding emojis to the names are great ways to add visual elements that can help your brain recall the pathways to your files.
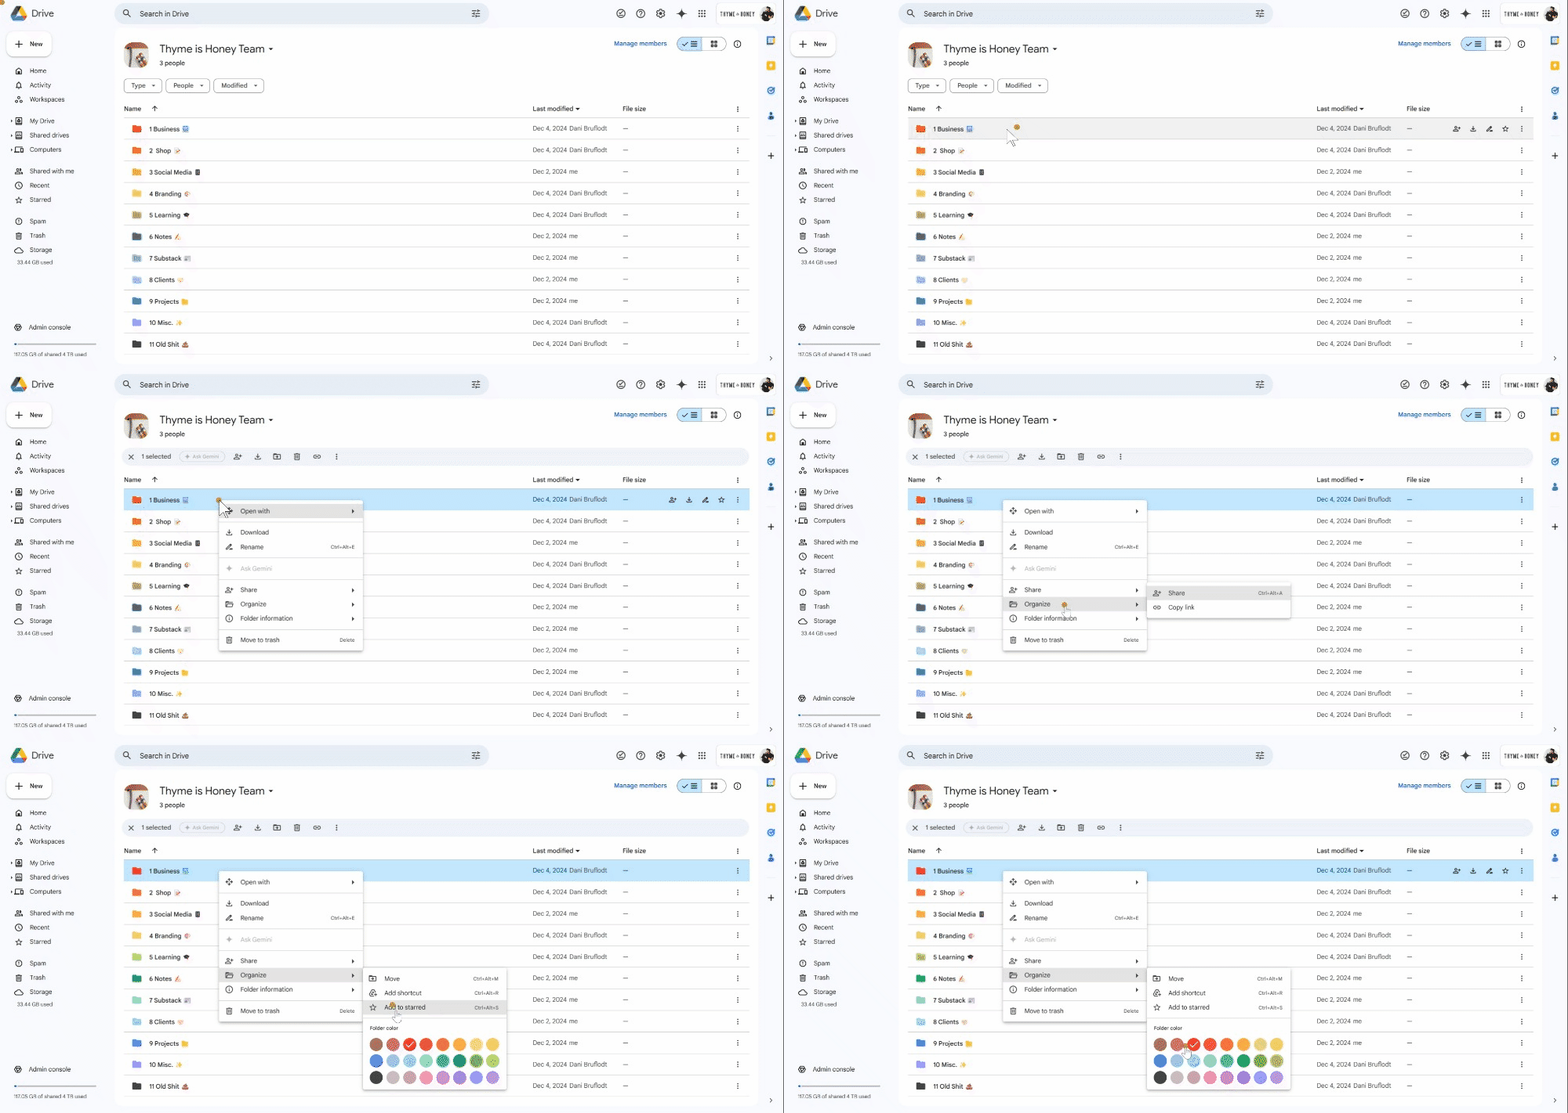
To add colors: Right-click on the folder name, select ‘Organize’ and choose one of the preset colors (you can’t add custom colors...but Google, if you’re listening— please add this feature).
To add emojis: Right-click the folder name, select 'Rename’ and add the emoji before or after the file name. Access your emojis keyboard with Windows+. on Windows or Control + Command + Spacebar on Mac. Here are more tips for using emojis on your computer.
🧹 STEP 6 - Sort Your Files into Top-Level Folders
With those steps done, its now time to make yourself something good to drink, put on your favorite playlist, light a candle, and begin sorting your files into the top-level folder they belong in.
Your goal is to keep moving, so try not to get hung up. If you aren’t sure what a file is, put it into one of your catch-all folders and review it later. If it’s helpful, set a timer for 30-minutes and see how much you can get done in that time (it will probably go faster than you think!).
TIPS FOR THIS STEP:
If there’s a file type you know can be bulk moved or deleted, do that first to clear things out. Use the search bar at the top of your drive to search for keywords (ex. If you know you can delete anything related to the course you launched 5 years ago but have now sunset, try searching the name of the course and then deleting or moving all those files in bulk).
To mass select files, click the top file, then hold the Shift key and click the last file in the set, then either drag and drop or right-click on the selection and choose ‘Organize‘ > ‘Move’.
Continue this “sorting session” until all your files are housed in a top-level folder, then give yourself a huge high-five ✋🏻
2️⃣ PHASE TWO (optional):
If you feel satisfied with your files in Top-Level folders, you can stop there! But for most of us, some Sub-Folders will help organize things even further. If that’s you, then follow these steps next.
📂 STEP 1 - Open your first top-level folder
Start by opening up your first top-level folder and assess the files that have been moved there (type, quantity, etc). In my example shared above, that’d be my “1 BUSINESS 💻” folder.
🤔 STEP 2 - Decide what Sub-Folders make sense
Assess the information inside that folder and decide what type of Sub-Folders make sense.
I don’t think that *every* file inside a Top-Level folder needs to be inside a Sub-Folder, but if there are 10+ files related to a certain topic, I’d suggest popping them into their own Sub-Folder.
🗃 STEP 3 - Create those sub-folders
Here’s what the Sub-Folders look like inside my “1 BUSINESS 💻”.
You can use numbers in the Folder Names again if you want to maintain a specific order that is not alphabetical. Note: See below for how to bulk-assign the folder color.
🎨 STEP 4 - Assign them the same color
I like to have the color of my Sub-Folders match the color of their Top-Level folder. This can again help your brain remember the pathway to a specific file.
To change the color on multiple files: click the top file, then hold the Shift key and click the last file in the set, then right-click on the selection > choose ‘Organize‘ > select color.
Since my “1 BUSINESS 💻” folder was assigned red, I assigned red to the Sub-Folders as well (shown above).
🧹 STEP 5 - Sort your files into the existing Sub-Folders
Once again it’s time to get comfy and do some sorting. Just drag and drop each file into the Sub-Folder where it belongs.
Repeat these steps for each of the Top-Level folders in your drive. When you’re done, give yourself another big high-five ✋🏻
3️⃣ PHASE 3 (optional)
🗑️ STEP 1 - Move items to the Trash
If you have plenty of space in your drive, you might just prefer to leave unneeded/irrelevant files in those “catch-all” folders you’ve already created.
But, if you need to open up space or just want to get rid of stuff you know you won’t need again, you can move it to Trash either by:
Right-clicking on the file and selecting “Move to Trash”.
Click the delete button on your keyboard with the file selected.
Drag and drop the file where “Trash” is listed in your left side panel
Remember you can mass-select multiple files and move them to the trash at once to go faster!
Files will be stored in Trash for 30 days, and you can opt to restore them during that time. After 30 days, they’ll be permanently deleted.
⛔ STEP 2 - Empty your Trash
Items in the Trash still take up storage space. So if you need to free up space OR you know you want those embarrassing photos deleted for good, you’ll need to empty your trash with these steps:
Click on “Trash” from the left side panel of your drive.
Click “Empty Trash” in the top right.
Confirm in the pop-up that you know this is permanent and click “Delete Forever”.
ADDITIONAL TIPS
FOR STAYING ORGANIZED:
👆🏻 One-touch method - Get in the habit of making sure your files are in the right spot as soon as you create them. Opening a new Google Doc? Take 3 seconds to put it in the right folder by going to File > Move.
📅 Monthly Review Day - If you have a designated day each month where you do things like pay invoices or assess your schedule, you can add a quick “2-minute Drive Cleanup” to your routine (Psst, I host these virtually on the first Monday of every month!)
FOR EFFICIENCY:
♻️ Undo and Redo: know the keyboard shortcuts for “Undo” and “Redo” and rely on them when you’re moving files. If you accidentally move something into a folder, you can undo that action with CTRL-Z on Windows, and can Redo the undone action with CTRL-Y on Windows.
🔍 Google Search is build in - At the very top of your Drive you should see a search bar. You can type in the file name, keywords, or file types — it’s super powerful and is a fast way to find specific things.
Click on the sliders along the right side of the Search Bar for advanced options. This can be especially helpful if you forget to name a File — as long as you know a word or phrase contained within its content, the ‘Has the Words’ option should turn it up.
⭐ Starring files - Along the left side of your drive you should see a folder titled “Starred”. If you want a folder or file to show up there, just click the Star icon that appears when you hover toward the far right of it’s name.
📱 Google Drive App - Access all your Drive files on-the-go by downloading the Google Drive App. I also like to add the widget to my phone’s home screen.
🌐 Google Chrome Address Bar - If you use Google Chrome as your web browser, it can automatically navigate to Google Drive files that you access frequently. Just start typing the file name into your address bar, and you should see the file suggested.
FREE DOWNLOAD
Grab this Google Doc that contains my File Structure suggestions. The exact structure laid out here is best suited to online business owners, but if you are in a different line of work you might still find the file helpful as you create your own Top and Sub Folders.
I hope this post has been helpful! If so, please tap the 🧡 at the top or bottom of this post — it helps more people discover my tutorials and I appreciate it so much. If you have questions, hit reply or leave a comment — I’m always happy to help. Visit my website to learn about my work + how I can help you with digital organization (and more!).
If you found this post helpful, you might also love:
HOW I CAN HELP:
🙋🏻♀️Ask me a question, submit feedback, or suggest a topic right here.
💻 Bring me on board to design your website, create digital products, and optimize the backend systems for your business with my Project Packages.
📞Have regular calls with me to work through goals, get accountability, plan your next big launch, or talk business strategy with a Call Package.
📝 Visit my Paper Goods Shop for planners, calendars, and more (take 10% off with the code SUBSTACK at checkout).
📊 Visit my Resources Page for free downloads, spreadsheets, and eBooks.







In case you'd find it interesting, my new top level folders as a non-business person:
1 ADMIN ⚠️ - Vital personal and household records (contracts, warranties, legal docs, taxes) and documents supporting these (applications, references, big receipts, budgets, admin projects).
2 SHORT TERM 📌- Expect to archive or delete after use (downloads to print, worksheets, examples, temporary projects).
3 HOME 🏡- Systems and information related to managing home and family (meal plans, recipes, house measurements, inventories, house rules, instruction manuals, home projects).
4 COMMUNITY 💞- People I am connected to and information related to each person/group (needs, resources, gift ideas, letters, networking ideas, local information, community projects).
5 CREATIVE 🎨 - Writings, Craft instructions, Crochet patterns, etc.
6 NOTES ✍🏻 - A place to put notes that get too big or important for just Keep (book/podcast integration/application, ideas, personal thoughts, journalish pieces).
7 OLD STUFF 🧹 - Archive of previous projects and docs I don't know about deleting.
Thank you, but I think I’ll have to hire someone.😂
Follow me?