


Create a Beautiful (+Free!) Email Signature ✍🏻
The simple hack I've used for 10+ years to create my customized email signature

An email signature is the standard way to end your emails — both personal and professional. They not only provide the basic information people might need, but can also direct them to your work, explain pronunciation and identify pronouns, or provide quick solutions by linking to an FAQ or help page.
But email providers don’t always provide options for creating a visually appealing email signature that includes a photo or brand logo and can maintain a two-column format without issues. Many third party services do offer this — and they charge you for it.

People are also often tempted to put all their information in a single image/graphic and insert that into their email signature — and while those can look quite pretty, they are generally not user friendly. Not all email clients automatically display images (meaning your info won’t display for all recipients), they can’t copy/paste your information, and you are limited to one hyperlink for the entire graphic. Most importantly, you’ll face challenges between desktop and mobile views — usually making the text small and difficult to read on mobile devices.
This is why I’ve always relied on this simple hack using Google Docs to create a simple, aesthetic, and functional email signature. Not only does it look great, but it’s free to make and it formats perfectly whether your email is read on desktop or mobile.
In today’s post I’ll walk you through how to make one and how to add it to your Gmail account. Ya ready?
Creating Your Signature
To create your signature you first want to open a blank Google Doc.
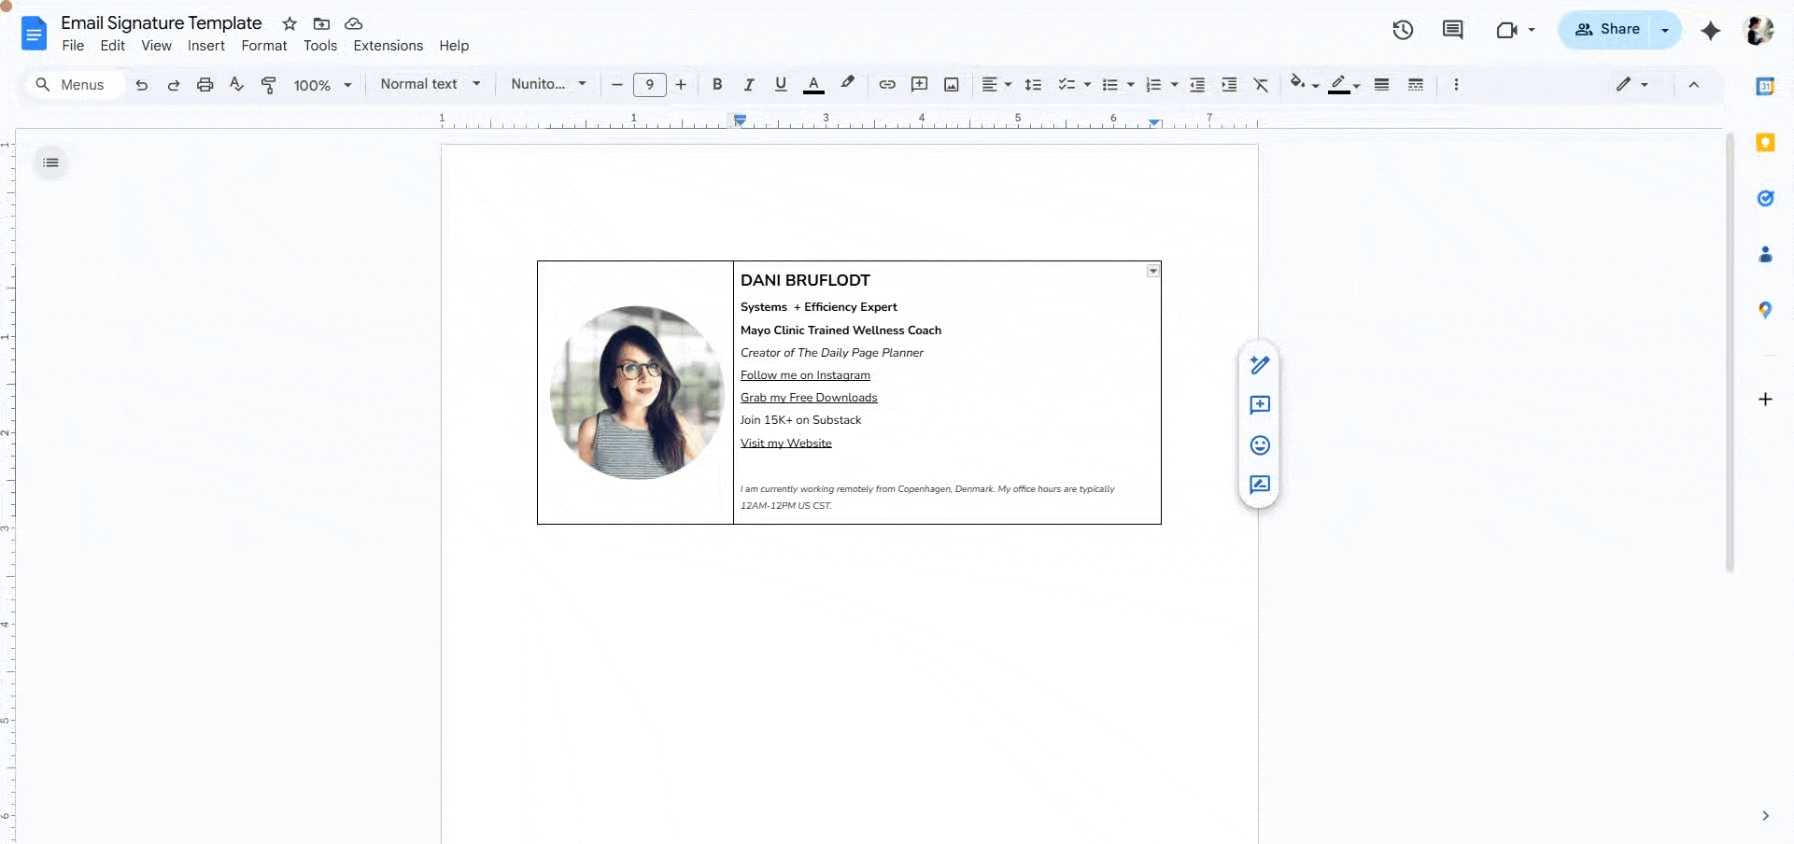
Next, you’ll insert a table by going to Insert (in top left) > Table.

You will then drag your curser across one row and two columns so that you are telling Google Docs that you want a table that is one row with two columns. It will then insert the table into your doc.
Now you’ll adjust the center line so that the left column is smaller than the right. To do that, just hover over the center line until your cursor turns into two arrows, then click and drag the line toward the left until the columns are split roughly 30%/70%. Tip: If you want your photo in the right column, do the opposite.

To add your photo or logo, simply place your curser in the left column, then go to “insert” and select “image”, then “upload from computer” (or wherever you’d like to get the image from).
Locate the file you want to add and choose “insert”. Tip: This image shouldn’t be large. I’d suggest resizing it to 400x400 pixels at most so that the file is as small as possible (see resources at the bottom of this post for how to create a circular image like mine). Tip: avoid large images, GIFs, or videos as they’ll increase your changes of landing in spam.

Now it’s time to add your name and other information you want included in your signature into the right column. This part is easy, just type it out! You can change the font, adjust bold/italics etc. Tip: I’d suggest keeping the information rather basic — avoid motivational quotes or too many links. I’d also suggest using the fonts that come standard in Google Docs and avoiding any custom uploaded fonts.
If there’s anything you want linked, you’ll add a hyperlink by highlighting the text, then clicking the hyperlink icon (looks like a little chain “link”) and pasting the URL then clicking “insert”.

Google might make your hyperlinks blue by default. You can adjust those colors manually by highlighting the text and choosing a new color, adding a custom brand color, making it all black, etc. You might also want to adjust the line spacing — I recommend trying to have the text in the right column be roughly the same height as the image/logo in the left column so that it looks balanced.
The last thing we want to do is hide the lines/border around the table. To do that simply right click inside the table > choose “table options” > expand the “color” menu at the bottom > change border size to “0 pt” and the lines should disappear.


Adding Your Signature in Gmail
Gmail has a built-in signature option that will allow you to automatically add the signature to any emails that you send, but you can use this method in any email service and the steps should be similar:
Before you navigate away from the Google Doc with your signature, highlight the entire table and copy it (ctrl-c or right-click > copy).
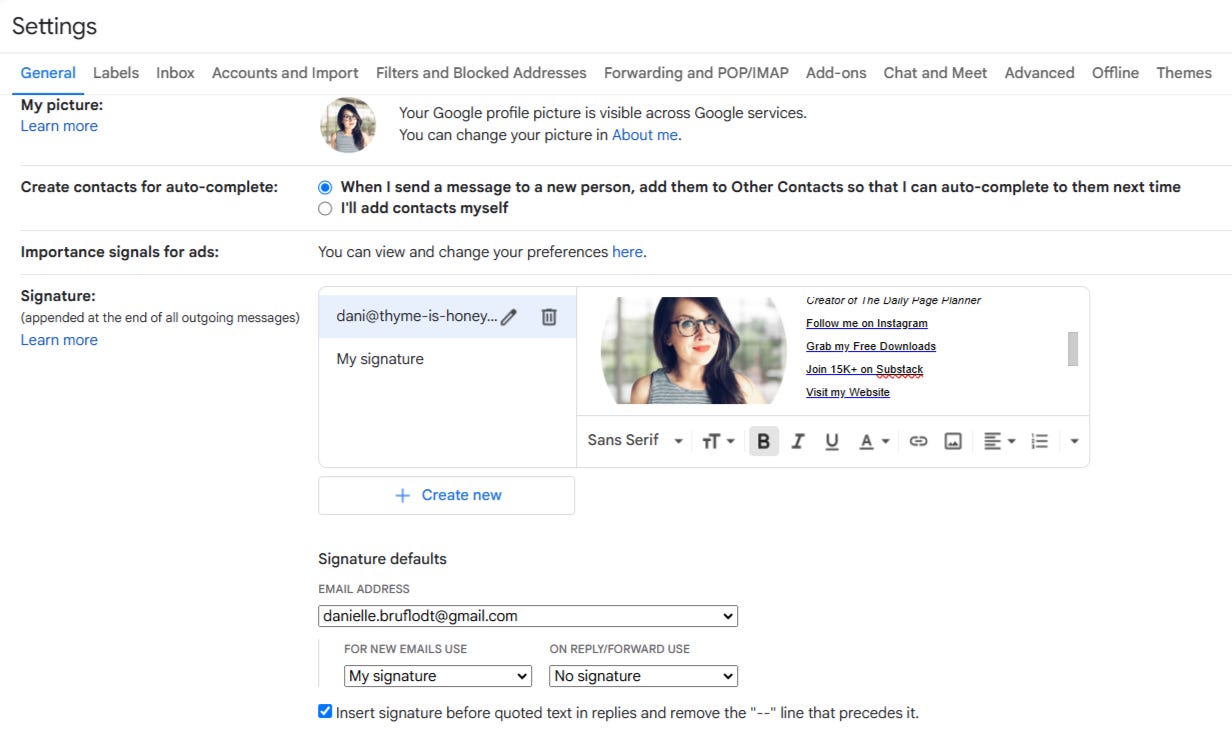
Then navigate to your Gmail inbox, and click the gear icon in the top right corner, then select “see all settings” from the top of the list.
Scroll down until you see the “signature” section.
This area should look like the image below, and you’ll simply click in what looks like an email composition area and paste (ctrl-v or right-click > paste). It should add the signature you just created into this area. If you have multiple emails set up for one account, you’ll need to paste the signature for each email address you use (you can also customize these so that it adds different signatures based on which email you send/reply from).

If you’d like Gmail to insert your signature automatically when you compose a new email or reply, you can adjust that from the options that display right below the Signature section. If you want to add it manually you can leave “no signature” for both drop-downs and can then add your signature on a case-by-base basis by clicking the pen icon when composing an email.
Before you exit, scroll to the bottom of the page and click “save changes”. It will then redirect you back to your inbox. The next time you go to compose an email, it should look something like this:

That’s it! Your email signature is now set up and ready to go! See below for a couple additional resources you might find helpful. I’d suggest saving your Google Doc so you have a template ready to go whenever you need to make changes.
Resources
Creating your image: You can use a simple photo editor (Paint.net etc.) to crop your photo into a circle or other shape, or you can hop over and use my Canva template. Drag and drop your photo into the frame, then save it as a .PNG with the option for “transparent background” selected (as shown below). The transparent background will ensure your photo looks clean, even if the recipient has dark mode or an alternate background color on their devices. The sky’s the limit here — you can add shapes, layer your logo alongside the photo, or add other elements. Scroll through the document to view some additional photo shapes.


Creating a ‘smart’ signature: If you tend to field a lot of repeat questions via email, consider building a “smart signature” that includes a link to an FAQ or contact page. For some inspo, check out this impressive list of guidelines created by University of Washington Professor Emily M. Bender. While that might not be realistic for all of us, hopefully it offers a few ideas of things you could provide in your email signature or on your website to cut down on email volume.
HOW I CAN HELP:
🙋🏻♀️Ask me a question, submit feedback, or suggest a topic right here.
💻 Bring me on board to design your website, create digital products, and optimize the backend systems for your business with my Project Packages.
📞Have regular calls with me to work through goals, get accountability, plan your next big launch, or talk business strategy with a Call Package.
📝 Visit my Paper Goods Shop for planners, calendars, and more (take 10% off with the code SUBSTACK at checkout).
📊 Visit my Resources Page for free downloads, spreadsheets, and eBooks.