


How to Organize Your Canva Account 🎨
The Complete Guide to Declutter and Optimize your Canva Workflows

Sometimes I can’t believe how many people are using Canva! Small business owners rely heavily on Canva, of course, but it’s a powerful tool for anyone, and thanks to Canva’s simple interface, practically anyone can use it!
Teachers use it to create worksheets or fun visuals for their classroom (and they offer free access for schools, students, and educators).
Parents use it to create chore charts and birthday party invites.
Therapists use it to create self-care and mental health checklists for patients.
Large organizations are using it for slideshows, social media graphics, + more.
But, perhaps you aren’t entirely sure what Canva even is — so, lemme back up:
Canva is a web-based graphic design program. It combines powerful design tools with the power of the internet (so many fonts! so much clip art! tons of stock photos and videos! AI assisted writing!) to make great design accessible and affordable.
As for me — I use it to create practically everything — social media graphics, free downloads, eBooks, slides for online courses, tech wallpapers, graphics for my Substack posts, product mock-ups for my online shop, interactive elements for my website!
And all that creativity can get really messy, really fast! But you know I have a method for keeping my Canva account meticulously organized and today I’m going to walk you through it. This got long because I wanted to keep everything organized in one place rather than breaking it up. But, I hope you can take it one section at a time and work through it at your own pace (and, psst, if you’re already tired you can just hire me to organize your Canva Account for you).
In this post you’ll find:
📖 A short glossary of important terms
🔍 How to quickly edit the names of all your Designs and Files
🗃️ My method for creating folders + moving files in bulk
🚫 How to avoid clutter + duplications
😄 How emojis are useful in Canva
🤯 My absolute BEST tip for organization and efficiency in Canva
🎨 Brand kits and how to set yours up
👨👩👧👦 Tips for team sharing without letting it get messy!
🔗 Different types of sharing/collab links
📌 Pinned designs, starring + more features you might not know about
Please note: Canva has a great app (for mobile and tablets) and a desktop application. For this guide, I’m simply using Canva.com. Canva has a free tier that gives you access to a TON of features, and you can upgrade to PRO for $10 per month. Learn more about pricing + free trials here.
This content is paywalled halfway through (I promise there’s tons of value above the fold!). If you are unable to upgrade your subscription at this time please hit reply or email me for complimentary access. Hopefully having your Canva account look like *this* feels worth a subscription:

📖 Important Terms
Before we dive in, let’s go over a few important terms related to how Canva is structured, so we’re on the same page:
Folder: just like a folder on your computer, Canva lets you create and name various folders so you can organize information within them.
Design: a design is going to be any new project you are creating in Canva, whether it’s text, image, slide, or video based. These are all known as a “Design”.
Canvas: A canvas is the workspace on which you’ll create your design. You can create one that is a custom size if you know the dimensions you want to work with, or you can chose from a list of presets (ex. Facebook Post, Instagram Carousel, Reel Cover, eBook etc.) and Canva will provide you the preferred dimensions.
Element: any creative asset that you use from Canva is going to be known as an “Element”. This could be a simple shape (like a circle or square), clip art, stock photos, or videos that you find in their library (which contains over 19 MILLION elements). Here’s a peek:
Template: a template is going to be a layout created for a specific purpose that you can use as a starting point for your own design. Examples would be an eBook cover, restaurant menu, Instagram post, poster, event invite etc. All these templates ready for you to plug and play!
Uploads: along with using Canva’s vast library of “Elements” you can also upload your own to use within your designs. The default location for these is your Uploads Folder, but you can also add them to specific folders you’ve created.
These are all you really need to know to work through my guide, but Canva also has this helpful list of 50 Design Terms for Non-Designers if you wanna go deeper on this.
The First Steps
If you are feeling extremely lazy or you just don’t care that much about *how* your designs are organized you can take the easy route (no shame! work smarter, not harder). These initial steps alone will work for some people, but it will depend on how much information you’re working with and you preference for organization. Either way, let’s all start here:
🔍 Utilize search
Canva has a built-in search bar at the top of the page that allows you to quickly search all of your designs or Canva’s library. This can be one of the fastest ways to find what you’re looking for. When you’re working within a design, you can also find items you’ve uploaded (such as your own photos, videos, or graphics) using search.

When you search, you can filter it by “Canva Templates” “All Your Content” or “Brand Templates”. With nothing selected it will search all your content + Canva’s content.
Worth noting that the Canva search function seems to do a pretty good job of searching all the text within your designs as well — so if you create an eBook about “zebras”, it should turn up when searching for “zebra” even if you simply named the file “eBook”.
The search method can be really useful if you aren’t working with a high volume of designs and files, but can devolve into chaos as your volume increases if you aren’t using any other organizational methods within Canva.
Relying only on search might not work well for teams or people doing client-based work, unless everyone can agree on (and remember) a naming convention for all uploaded elements and created designs, becaaauuuseee….
👀 Use Detailed File and Design Names
…to find what you’re looking for you need to be using detailed names for your designs and uploaded files. I suggest being specific and using keywords. That way you know what to search for and Canva can turn it up.
You can simplify this by making sure all files you upload have detailed file names before you upload them to Canva, but if you already have a bunch of files and designs in your Canva account there’s a pretty quick and easy way to do this. Just follow these steps:
Log in to your Canva account and go to Canva.com/Projects (or click “project” along the left side of the Canva home screen:
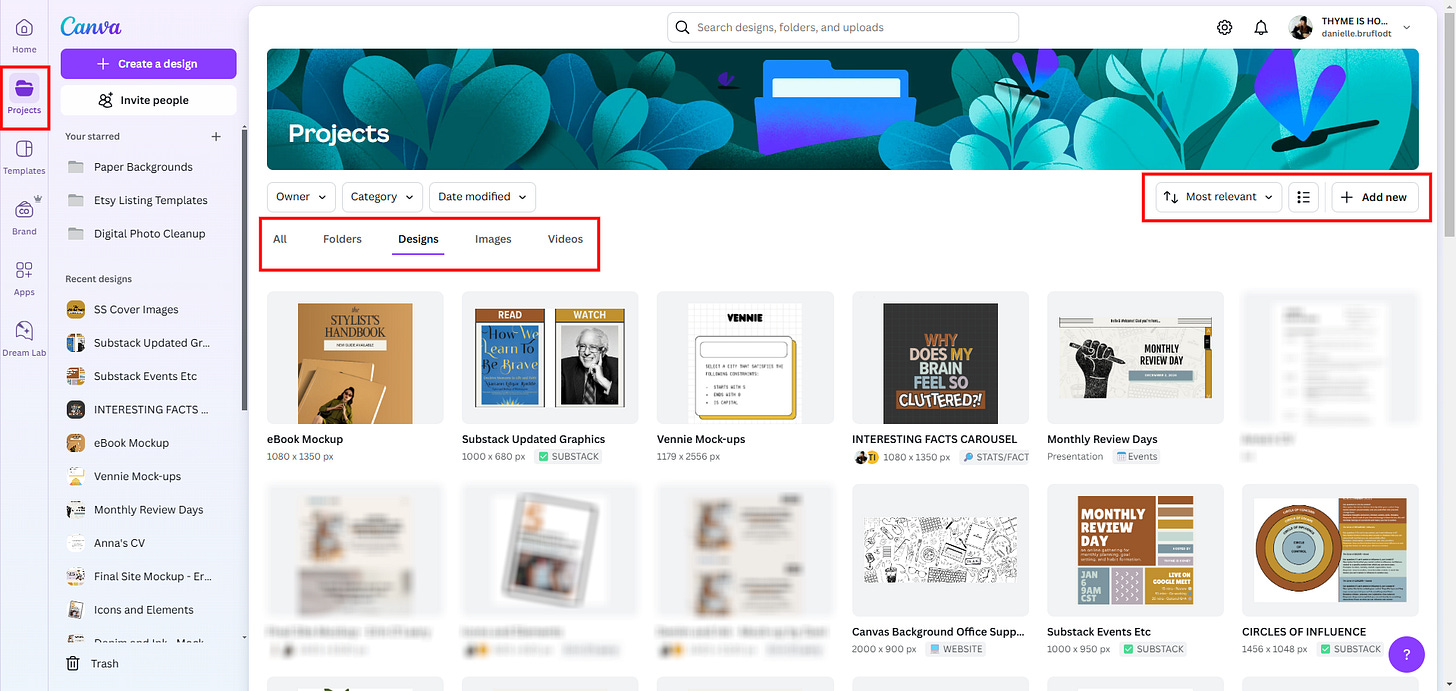
Near the top center of the page you should see tabs for “All” “Folders” “Designs” “Images” and “Videos”.
If you want to edit the names of your designs, click the tab for “Designs”, if you want to edit the names of images or videos you have uploaded click on “Images” or “Videos”
I find this easiest when it is in “Grid View”, which will put large thumbnails of all your designs in a grid format that allows you see more at once (it will even cycle through the pages of a multi-page design). To do this, look toward the top right corner of the page and you should see a list/grid icon like the one below. Tap it to toggle between the two options:
You should see the file name of each item listed right below the thumbnail in bold. To edit it, simply click the text and replace it, like so:
Work through the Designs, Images, and Videos tabs until you’ve adjusted the names of all relevant files and feel good about. This goes faster than you might expect!
If you come across a design that you no longer need and would consider deleting, I suggest changing the file name to “Delete” or adding “Delete” into the existing file name and leaving them where they are for right now. It’ll be faster to delete them in bulk later (we’ll come back to this!).


The “Next Level”
If you like a bit more organization (raises hand!), or you’re one of those people working with so many files or team members that you’d drive yourself mad trying to remember file names — you’ll wanna work through this section to ensure all your files and designs are in their proper place (don’t miss my BIGGEST tip, at the bottom! *life changing*).
🗃️ Create Folders
The first rule of Canva organization is to create folders. This can help organize the designs you make within Canva AND any files you upload to Canva (such as brand photos, custom icons, or your logo variations). You can also send Canva elements (the clip art, icons, photos, and videos within Canva’s vast library) to your folders so that everything you need for a project is organized in one place.
My process for folder creation is similar no matter what platform I’m using:
First I brainstorm the top-level folders I need for my content. Most people will probably require between 5-15 top-level folders (see a list of mine, below).
Create those folders and put an emoji at the front of the folder name (see below for more on this!).
Then I start moving my existing designs and uploads into my newly created folders until everything is sorted into a folder (see below for tips on moving your files and designs!).
Next, I’d open each of those top-level folders and determine if I need to create any sub-folders to organize the information within them. If so, I’ll create those and continue sorting the files and designs accordingly.
For what it’s worth, I have 13 Top-Level Folders in Canva and have them set up like this:
Keep reading with a 7-day free trial
Subscribe to Thyme is Honey to keep reading this post and get 7 days of free access to the full post archives.